Բաց թողնել հիմնական բովանդակությունը

Ինչպե՞ս Excel- ում հրամանի կոճակի միջոցով ավտոմատ կերպով տեղադրել դատարկ նոր տող:

Շատ դեպքերում կարող է անհրաժեշտ լինել ձեր աշխատաթերթի նշված դիրքում տեղադրել դատարկ նոր տող: Այս հոդվածում մենք ձեզ ցույց կտանք, թե ինչպես ինքնաբերաբար տեղադրել դատարկ նոր տող ՝ Excel- ում հրահանգի կոճակի վրա սեղմելով:

Տեղադրեք դատարկ նոր տող ավտոմատ կերպով հրամանի կոճակի միջոցով


Տեղադրեք դատարկ նոր տող ավտոմատ կերպով հրամանի կոճակի միջոցով

Դուք կարող եք գործարկել հետևյալ VBA կոդը ՝ դատարկ նոր տող տեղադրելու համար ՝ կտտացնելով Հրահանգի կոճակին: Խնդրում եմ արեք հետևյալ կերպ.

1. Նախ, անհրաժեշտ է տեղադրել հրամանի կոճակը: Խնդրում ենք սեղմել Երեվակիչ > Տեղադրել > Հրամանի կոճակ (ActiveX կառավարման), Տեսեք,

2. Դրանից հետո նկարեք հրամանի կոճակը աշխատաթերթում, որը անհրաժեշտ է ավելացնել նոր տողեր, աջով կտտացրեք Կոճակի կոճակին և կտտացրեք Հատկություններ աջ կտտացնելու ցանկից:

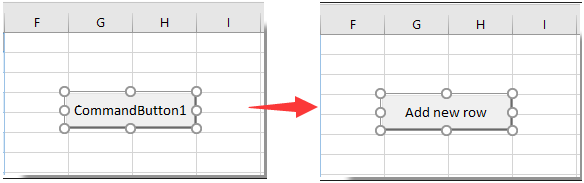
3. Մեջ Հատկություններ երկխոսության տուփ, մուտքագրեք հրամանի կոճակի ցուցադրվող տեքստը մեջ Ձերբակալություն տուփ տակ Կատեգորիա էջանիշը, ապա փակել երկխոսության տուփը:

Դուք կարող եք տեսնել, որ հրամանի կոճակի ցուցադրվող տեքստը փոխված է, ինչպես ցույց է տրված ստորև նշված նկարը:

4. Կրկին աջ կտտացրեք հրամանի կոճակին և կտտացրեք Դիտել կոդը աջ կտտացնելու ցանկից:

5. Հետո Microsoft Visual Basic հավելվածների համար պատուհանը, խնդրում ենք փոխարինել բնօրինակ կոդը հետևյալ VBA կոդով `մեջ Կոդ պատուհան.

VBA կոդ. Ավտոմատ տեղադրեք դատարկ նոր տողը հրամանի կոճակի միջոցով

Private Sub CommandButton1_Click()
    Dim rowNum As Integer
    On Error Resume Next
    rowNum = Application.InputBox(Prompt:="Enter Row Number where you want to add a row:", _
                                    Title:="Kutools for excel", Type:=1)
    Rows(rowNum & ":" & rowNum).Insert Shift:=xlDown
End Sub

ՆշումԿոդում, CommanButton1- ը ձեր ստեղծած հրամանի կոճակի անունն է:

6. Մամուլ ալտ + Q ստեղները միաժամանակ փակելու համար Microsoft Visual Basic հավելվածների համար պատուհան Եվ անջատեք Դիզայնի ռեժիմ տակ Երեվակիչ էջանիշը.

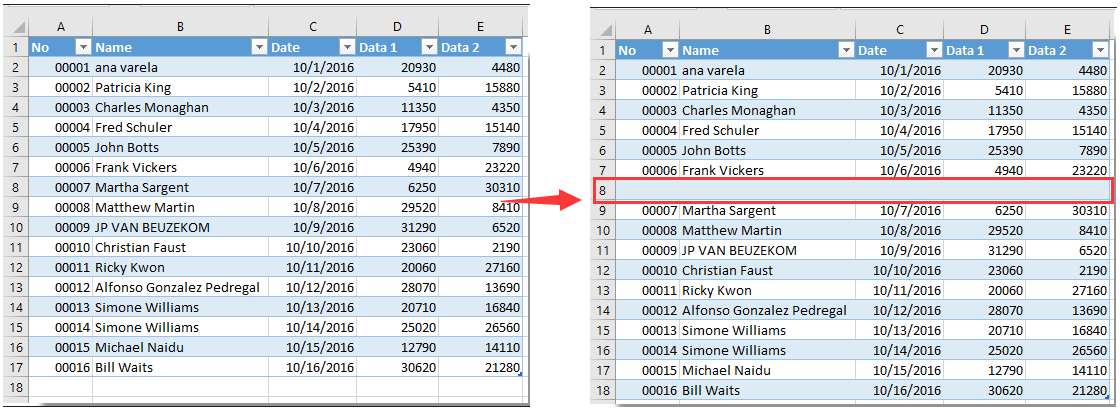
7. Սեղմեք տեղադրված հրամանի կոճակը և ա Excel- ի համար նախատեսված գործիքներ երկխոսության պատուհանը բացվում է: Մուտքագրեք որոշակի տողի համար, որտեղ ցանկանում եք ավելացնել դատարկ նոր տող, և այնուհետև կտտացրեք այն OK կոճակ Տեսեք,

Դրանից հետո դատարկ նոր շարքը տեղադրվում է ձեր աշխատաթերթի նշված դիրքում, ինչպես ցույց է տրված նկարում: Եվ դա պահպանում է վերը նշված վանդակի բջիջի ձևաչափումը:


Առնչվող հոդվածներ:

Գրասենյակի արտադրողականության լավագույն գործիքները

🤖 Kutools AI օգնականՀեղափոխություն կատարել տվյալների վերլուծության հիման վրա՝ Խելացի կատարում   |  Ստեղծեք ծածկագիր  |  Ստեղծեք հատուկ բանաձևեր  |  Վերլուծել տվյալները և ստեղծել գծապատկերներ  |  Invoke Kutools-ի գործառույթները...
Հանրաճանաչ հատկություններ: Գտեք, ընդգծեք կամ նույնականացրեք կրկնօրինակները   |  Deleteնջել դատարկ շարքերը   |  Միավորել սյունակները կամ բջիջները՝ առանց տվյալների կորստի   |   Կլոր առանց բանաձևի ...
Super Փնտրել: Բազմաթիվ չափանիշների VLookup    Բազմակի արժեք VLookup  |   VLookup բազմաթիվ թերթերում   |   Fuzzy Փնտրել ....
Ընդլայնված բացվող ցուցակ: Արագ ստեղծեք բացվող ցուցակը   |  Կախված բացվող ցուցակ   |  Բազմակի ընտրություն Drop Down ցուցակ ....
Սյունակի կառավարիչ: Ավելացրեք որոշակի քանակությամբ սյունակներ  |  Տեղափոխել սյունակները  |  Փոխարկել թաքնված սյունակների տեսանելիության կարգավիճակը  |  Համեմատեք միջակայքերը և սյունակները ...
Առանձնահատկություններ: Ցանցի կենտրոնացում   |  Դիզայնի տեսք   |   Մեծ Formula Bar    Աշխատանքային գրքույկի և թերթիկների կառավարիչ   |  Ռեսուրսների գրադարան (Ավտոմատ տեքստ)   |  Ամսաթիվ ընտրող   |  Միավորել աշխատանքային թերթերը   |  Գաղտնագրել/գաղտնազերծել բջիջները    Ուղարկեք նամակներ ըստ ցանկի   |  Սուպեր զտիչ   |   Հատուկ զտիչ (զտել թավ/շեղ/շեղված...) ...
Լավագույն 15 գործիքների հավաքածու12 Տեքստ Գործիքներ (Ավելացրեք տեքստ, Հեռացնել նիշերը, ...)   |   50+ Աղյուսակ Տեսակներ (Գանտի աղյուսակը, ...)   |   40+ Գործնական Բանաձեւեր (Հաշվարկել տարիքը ՝ ելնելով ծննդյան տարեդարձից, ...)   |   19 միացում Գործիքներ (Տեղադրեք QR կոդ, Տեղադրեք նկար ուղուց, ...)   |   12 Փոխարկում Գործիքներ (Բառեր համարներ, Արտարժույթի փոխակերպումը, ...)   |   7 Միաձուլում և պառակտում Գործիքներ (Ընդլայնված կոմբինատ տողեր, Պառակտված բջիջներ, ...)   |   ... եւ ավելին

Լրացրեք ձեր Excel-ի հմտությունները Kutools-ի հետ Excel-ի համար և փորձեք արդյունավետությունը, ինչպես երբեք: Kutools-ը Excel-ի համար առաջարկում է ավելի քան 300 առաջադեմ առանձնահատկություններ՝ արտադրողականությունը բարձրացնելու և ժամանակ խնայելու համար:  Սեղմեք այստեղ՝ Ձեզ ամենաշատ անհրաժեշտ հատկանիշը ստանալու համար...

Նկարագրություն


Office Tab- ը Tabbed ինտերֆեյսը բերում է Office, և ձեր աշխատանքը շատ ավելի դյուրին դարձրեք

  • Միացնել ներդիրներով խմբագրումը և ընթերցումը Word, Excel, PowerPoint- ով, Հրատարակիչ, Access, Visio և Project:
  • Բացեք և ստեղծեք բազմաթիվ փաստաթղթեր նույն պատուհանի նոր ներդիրներում, այլ ոչ թե նոր պատուհաններում:
  • Բարձրացնում է ձեր արտադրողականությունը 50%-ով և նվազեցնում մկնիկի հարյուրավոր սեղմումները ձեզ համար ամեն օր:
Comments (26)
No ratings yet. Be the first to rate!
This comment was minimized by the moderator on the site
Bedankt voor je uitleg. Ik heb de formule toegepast maar bekom dat ik maar 1 lijn kan toevoegen. Daarna laat de knop het niet meer toe en moet ik eerst mijn toegevoegde rij verwijderen. Is er een manier om dit aan te passen?
This comment was minimized by the moderator on the site
Is there a way to make to row inset always below the last entry?
This comment was minimized by the moderator on the site
How do I do the opposite of this and create a button that will delete a row?
This comment was minimized by the moderator on the site
Hi Big Ant,

Here's the modified code to delete a specified row when the Command Button is clicked:


Private Sub CommandButton1_Click()
'Updated by Extendoffice 20230817
    Dim rowNum As Integer
    On Error Resume Next
    rowNum = Application.InputBox(Prompt:="Enter Row Number which you want to delete:", _
                                    Title:="Kutools for excel", Type:=1)
    If rowNum <> 0 Then
        Rows(rowNum).Delete Shift:=xlUp
    End If
End Sub
This comment was minimized by the moderator on the site
Criei uma linha e nomeei como spotB,
Mudei a altura da linha para 0,01 para ocultá-la (apenas por estética).
Criei um botão:
Application.Goto Reference:="spotB"
Selection.EntireRow.Insert

Problema resolvido.

Obrigado pelos códigos a Mah e crystal, mas eu tinha 8 títulos para separar, cada um inserindo linhas quando necessário ao usuário, e não queria nenhuma pergunta sobre quantidade de linhas, os usuários não leem perguntas e clicam logo em OK, depois reclamam...
This comment was minimized by the moderator on the site
... Testei os códigos acima, mas, como se trata de pessoas que vão usar, não é viável os box que pedem a linha e a quantidade, não dá...
This comment was minimized by the moderator on the site
Caros colegas, após pesquisar (bastante) na net não consegui encontrar um atalho, comando, código, nada, nada, que eu possa usar para inserir em uma macro APENAS uma forma de inserir uma linha ABAIXO da célula ativa. Isto porquê se eu gravar o endereço da célula, ele não muda, fica sempre na mesma célula e as seguintes não vão ficar corretamente abaixo, e se eu usar um endereço de célula fixo, a linha tem que ser inserida acima, mas não formata da forma desejada, que seria o formato das linhas de cima.

Acho que o código existe, só não encontro, já tentei várias formas, selecionando um fixo, subindo uma linha e pedindo para inserir após, mas as seguintes não funcionam de acordo.

Alguém poderia me ajudar?
This comment was minimized by the moderator on the site
Hi

I used the code but wanted to add rows with formulas, therefore I added the last line to be able to add the rows with formulas.
However, in my excel file and in column "F" I have a text which can be entered manually and would be different in different cases. Therefore, I would like to add rows below the reference row with keeping the formulas and values in all cells except the cell from column "F" which I would like to be copied as blank!
Could you please help me with what should I add to the underneath code to be able to have the cells of column "F" blank whenever I add a row with this code?
thanks in advance!

Private Sub CommandButton1_Click()
Dim xIntRrow As Integer
Dim rowNum As Integer
On Error Resume Next
rowNum = Application.InputBox(Prompt:="Enter Row Number where you want to add a row:", _
Title:="Kutools for excel", Type:=1)
xIntRrow = Application.InputBox(Prompt:="Type in the number of rows you want to insert", _
Title:="Kutools for excel", Type:=1)
Rows(rowNum + 1 & ":" & rowNum + 1).EntireRow.Resize(xIntRrow).Insert Shift:=xlShiftDown
Rows(rowNum).Resize(xIntRrow + 1).FillDown

End Sub
This comment was minimized by the moderator on the site
Hi Mah,
The following VBA code may do you a favor. Please give it a try. Thank you.

Private Sub CommandButton1_Click()
'Updated by Extendoffice 20220707
    Dim rowNum As Integer
    Dim xRg1, xRg2 As Range
    
    On Error Resume Next
    
    rowNum = Application.InputBox(Prompt:="Enter Row Number where you want to add a row:", _
                                    Title:="Kutools for excel", Type:=1)
    
    Rows(rowNum & ":" & rowNum).Insert Shift:=xlDown
    Rows((rowNum - 1) & ":" & (rowNum - 1)).Copy
    Rows(rowNum & ":" & rowNum).Select
    Selection.PasteSpecial Paste:=xlPasteAll, Operation:=xlNone, SkipBlanks:= _
        False, Transpose:=False
    Range("F" & rowNum).Value = ""
End Sub
This comment was minimized by the moderator on the site
Sub AddNewRow()


Private Sub CommandButton1_Click()

ActiveSheet.Unprotect Password:="1234"


Dim mySheets

Dim i As Long


mySheets = Array("Sheet2")


For i = LBound(mySheets) To UBound(mySheets)

With Sheets(mySheets(i))

.Range("B10").EntireRow.Insert Shift:=xlDown

.Range("B10:H10").Borders.Weight = xlThin

End With

Next i


ActiveSheet.Protect Password:="1234"


End Sub

I don't know if this will work for you. It worked quite well for me. I even left unprotected cells that you can input data and the formulas are still active. Took me a whole day to figure it out. replace "1234" with whatever password you feel like, "Sheet2" with the Sheet you are working with and input the range you want.
The code first unprotects the worksheet, adds row and protects the worksheet.
This comment was minimized by the moderator on the site
is it possible to create in a different sheet? I really need that
This comment was minimized by the moderator on the site
can possible insert multiple sheet row at one time click by this .
This comment was minimized by the moderator on the site
Hi,
The below code can help you solve the problem. Please have a try.

Private Sub CommandButton1_Click()
Dim xIntRrow As Integer
Dim rowNum As Integer
On Error Resume Next
rowNum = Application.InputBox(Prompt:="Enter Row Number where you want to add a row:", _
Title:="Kutools for excel", Type:=1)
xIntRrow = Application.InputBox(Prompt:="Type in the number of rows you want to insert", _
Title:="Kutools for excel", Type:=1)
Rows(rowNum + 1 & ":" & rowNum + 1).EntireRow.Resize(xIntRrow).Insert Shift:=xlShiftDown

End Sub
There are no comments posted here yet
Load More
Please leave your comments in English
Posting as Guest
×
Rate this post:
0   Characters
Suggested Locations