Ինչպե՞ս Excel- ում ամսական / տարեկան օրացույց ստեղծել:
Որոշ ժամանակ անհրաժեշտ է Excel- ում ստեղծել որոշակի ամսվա կամ տարվա օրացույց, ինչպե՞ս կարող եք այն արագ լուծել: Այս ձեռնարկը ներկայացնում է Excel- ում ամսական կամ տարեկան օրացույց արագ ստեղծելու հնարքները:
Ստեղծեք ամսական կամ տարեկան օրացույց Excel ձևանմուշի կողմից
Ստեղծեք ամսական օրացույց VBA- ի կողմից
Հավիտենական օրացույցի միջոցով հեշտությամբ ստեղծեք ամսական կամ տարեկան օրացույց ![]()
 Ստեղծեք ամսական կամ տարեկան օրացույց Excel ձևանմուշի կողմից

Excel- ում ամսական կամ տարեկան օրացույց ստեղծելու համար կարող եք օգտագործել օրացույցի ձևանմուշ:
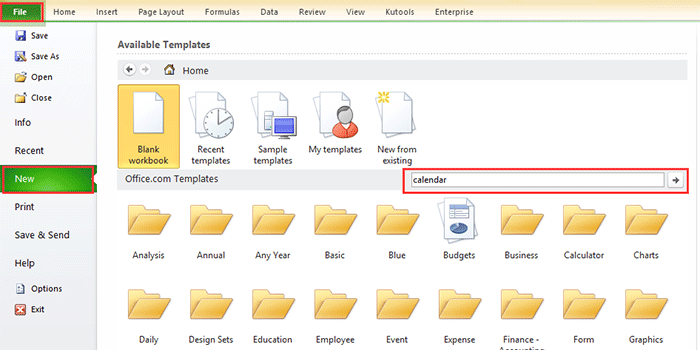
1. Excel 2010/2013-ում կտտացրեք Ֆայլ > նոր, Excel 2007-ում կտտացրեք Գրասենյակային կոճակ > նոր, ապա դուրս գալու պատուհանի աջ հատվածում մուտքագրեք օրացույց որոնիչի մեջ: Տեսեք,
Excel- ում 2010/2013
Excel 2007-ում

2. Մամուլ Մտնել, ապա պատուհանում նշվում են օրացույցերի բազմաթիվ տեսակներ: Ընտրեք ձեզ անհրաժեշտ օրացույցի մեկ տեսակ և կտտացրեք Ներբեռնել (կամ ստեղծել) ճիշտ պատուհանում: Տեսեք,

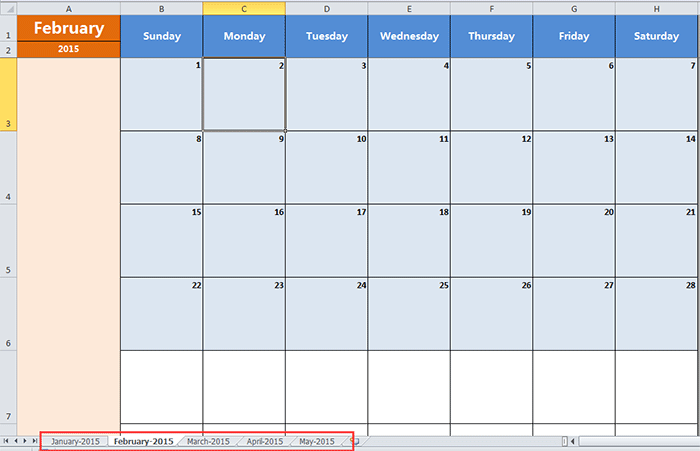
Այժմ օրացույցը ստեղծվում է նոր աշխատանքային գրքում: Տեսեք,

Ստեղծեք ամսական օրացույց VBA- ի կողմից
Երբեմն անհրաժեշտ է, որ ստեղծեք մեկամսյա օրացույց նշված ամսվա համար, ինչպիսին է 2015-ի հունվարը: Կարող է դժվար լինել աղբ գտնել այդպիսի օրացույցի ձևանմուշը վերը նշված մեթոդով: Այստեղ ես ներկայացնում եմ VBA կոդ, որը կօգնի ձեզ ստեղծել ամսական որոշակի օրացույց:
1. Մամուլ Alt + F11 բացելու ստեղները Microsoft Visual Basic հավելվածների համար պատուհանը, սեղմեք Տեղադրել > Մոդուլներ, ապա պատճենեք և տեղադրեք VBA կոդի տակ ՝ պատուհանում:
VBA. Ստեղծեք ամսական օրացույց:
Sub CalendarMaker()

       ' Unprotect sheet if had previous calendar to prevent error.
       ActiveSheet.Protect DrawingObjects:=False, Contents:=False, _
          Scenarios:=False
       ' Prevent screen flashing while drawing calendar.
       Application.ScreenUpdating = False
       ' Set up error trapping.
       On Error GoTo MyErrorTrap
       ' Clear area a1:g14 including any previous calendar.
       Range("a1:g14").Clear
       ' Use InputBox to get desired month and year and set variable
       ' MyInput.
       MyInput = InputBox("Type in Month and year for Calendar ")
       ' Allow user to end macro with Cancel in InputBox.
       If MyInput = "" Then Exit Sub
       ' Get the date value of the beginning of inputted month.
       StartDay = DateValue(MyInput)
       ' Check if valid date but not the first of the month
       ' -- if so, reset StartDay to first day of month.
       If Day(StartDay) <> 1 Then
           StartDay = DateValue(Month(StartDay) & "/1/" & _
               Year(StartDay))
       End If
       ' Prepare cell for Month and Year as fully spelled out.
       Range("a1").NumberFormat = "mmmm yyyy"
       ' Center the Month and Year label across a1:g1 with appropriate
       ' size, height and bolding.
       With Range("a1:g1")
           .HorizontalAlignment = xlCenterAcrossSelection
           .VerticalAlignment = xlCenter
           .Font.Size = 18
           .Font.Bold = True
           .RowHeight = 35
       End With
       ' Prepare a2:g2 for day of week labels with centering, size,
       ' height and bolding.
       With Range("a2:g2")
           .ColumnWidth = 11
           .VerticalAlignment = xlCenter
           .HorizontalAlignment = xlCenter
           .VerticalAlignment = xlCenter
           .Orientation = xlHorizontal
           .Font.Size = 12
           .Font.Bold = True
           .RowHeight = 20
       End With
       ' Put days of week in a2:g2.
       Range("a2") = "Sunday"
       Range("b2") = "Monday"
       Range("c2") = "Tuesday"
       Range("d2") = "Wednesday"
       Range("e2") = "Thursday"
       Range("f2") = "Friday"
       Range("g2") = "Saturday"
       ' Prepare a3:g7 for dates with left/top alignment, size, height
       ' and bolding.
       With Range("a3:g8")
           .HorizontalAlignment = xlRight
           .VerticalAlignment = xlTop
           .Font.Size = 18
           .Font.Bold = True
           .RowHeight = 21
       End With
       ' Put inputted month and year fully spelling out into "a1".
       Range("a1").Value = Application.Text(MyInput, "mmmm yyyy")
       ' Set variable and get which day of the week the month starts.
       DayofWeek = WeekDay(StartDay)
       ' Set variables to identify the year and month as separate
       ' variables.
       CurYear = Year(StartDay)
       CurMonth = Month(StartDay)
       ' Set variable and calculate the first day of the next month.
       FinalDay = DateSerial(CurYear, CurMonth + 1, 1)
       ' Place a "1" in cell position of the first day of the chosen
       ' month based on DayofWeek.
       Select Case DayofWeek
           Case 1
               Range("a3").Value = 1
           Case 2
               Range("b3").Value = 1
           Case 3
               Range("c3").Value = 1
           Case 4
               Range("d3").Value = 1
           Case 5
               Range("e3").Value = 1
           Case 6
               Range("f3").Value = 1
           Case 7
               Range("g3").Value = 1
       End Select
       ' Loop through range a3:g8 incrementing each cell after the "1"
       ' cell.
       For Each cell In Range("a3:g8")
           RowCell = cell.Row
           ColCell = cell.Column
           ' Do if "1" is in first column.
           If cell.Column = 1 And cell.Row = 3 Then
           ' Do if current cell is not in 1st column.
           ElseIf cell.Column <> 1 Then
               If cell.Offset(0, -1).Value >= 1 Then
                   cell.Value = cell.Offset(0, -1).Value + 1
                   ' Stop when the last day of the month has been
                   ' entered.
                   If cell.Value > (FinalDay - StartDay) Then
                       cell.Value = ""
                       ' Exit loop when calendar has correct number of
                       ' days shown.
                       Exit For
                   End If
               End If
           ' Do only if current cell is not in Row 3 and is in Column 1.
           ElseIf cell.Row > 3 And cell.Column = 1 Then
               cell.Value = cell.Offset(-1, 6).Value + 1
               ' Stop when the last day of the month has been entered.
               If cell.Value > (FinalDay - StartDay) Then
                   cell.Value = ""
                   ' Exit loop when calendar has correct number of days
                   ' shown.
                   Exit For
               End If
           End If
       Next

       ' Create Entry cells, format them centered, wrap text, and border
       ' around days.
       For x = 0 To 5
           Range("A4").Offset(x * 2, 0).EntireRow.Insert
           With Range("A4:G4").Offset(x * 2, 0)
               .RowHeight = 65
               .HorizontalAlignment = xlCenter
               .VerticalAlignment = xlTop
               .WrapText = True
               .Font.Size = 10
               .Font.Bold = False
               ' Unlock these cells to be able to enter text later after
               ' sheet is protected.
               .Locked = False
           End With
           ' Put border around the block of dates.
           With Range("A3").Offset(x * 2, 0).Resize(2, _
           7).Borders(xlLeft)
               .Weight = xlThick
               .ColorIndex = xlAutomatic
           End With

           With Range("A3").Offset(x * 2, 0).Resize(2, _
           7).Borders(xlRight)
               .Weight = xlThick
               .ColorIndex = xlAutomatic
           End With
           Range("A3").Offset(x * 2, 0).Resize(2, 7).BorderAround _
              Weight:=xlThick, ColorIndex:=xlAutomatic
       Next
       If Range("A13").Value = "" Then Range("A13").Offset(0, 0) _
          .Resize(2, 8).EntireRow.Delete
       ' Turn off gridlines.
       ActiveWindow.DisplayGridlines = False
       ' Protect sheet to prevent overwriting the dates.
       ActiveSheet.Protect DrawingObjects:=True, Contents:=True, _
          Scenarios:=True

       ' Resize window to show all of calendar (may have to be adjusted
       ' for video configuration).
       ActiveWindow.WindowState = xlMaximized
       ActiveWindow.ScrollRow = 1

       ' Allow screen to redraw with calendar showing.
       Application.ScreenUpdating = True
       ' Prevent going to error trap unless error found by exiting Sub
       ' here.
       Exit Sub
   ' Error causes msgbox to indicate the problem, provides new input box,
   ' and resumes at the line that caused the error.
   MyErrorTrap:
       MsgBox "You may not have entered your Month and Year correctly." _
           & Chr(13) & "Spell the Month correctly" _
           & " (or use 3 letter abbreviation)" _
           & Chr(13) & "and 4 digits for the Year"
       MyInput = InputBox("Type in Month and year for Calendar")
       If MyInput = "" Then Exit Sub
       Resume
   End Sub
VBA- ն գալիս է այս ցանցից https://support.microsoft.com/en-us/kb/150774
2. Մամուլ F5 բանալի կամ Վազում կոճակը, և դուրս է գալիս երկխոսություն ՝ հիշեցնելու համար, որ մուտքագրեք օրացույց ստեղծելու համար անհրաժեշտ կոնկրետ ամիսը, տես նկարի նկարը.

3: սեղմեք OK, Այժմ ակտիվ թերթում ստեղծվում է 2015 թվականի հունվարի օրացույց:

Բայց վերը նշված մեթոդներում կան որոշ սահմանափակումներ, օրինակ ՝ եթե ուզում եք միանգամից օրացույց ստեղծել հունվար-մայիս ամիսներին, հարկավոր է օրացույցը ստեղծել հինգ անգամ ՝ վերը նշված երկու մեթոդներով: Այժմ ես ներկայացնում եմ հարմարավետ ծրագիր `այն արագ և հեշտությամբ լուծելու համար
Հավիտենական օրացույցի միջոցով հեշտությամբ ստեղծեք ամսական կամ տարեկան օրացույց
Մշտական օրացույց - ը հզոր կոմունալ ծառայություններից մեկն է Երևանում Excel- ի համար նախատեսված գործիքներ, և դա կարող է օգնել ձեզ արագորեն միանգամից ստեղծել ամսական կամ տարեկան օրացույց Excel- ում:
| Excel- ի համար նախատեսված գործիքներ, ավելի քան 300 հարմար գործառույթներ, ավելի հեշտացնում է ձեր գործերը: | ||
1: սեղմեք ձեռնարկություն > Աշխատանքային թերթիկ > Մշտական օրացույց, տե՛ս սքրինշոթը.

2. Բացվող պատուհանում նշեք այն ամսվա տևողությունը, որը ցանկանում եք ստեղծել օրացույցը և կտտացնել Ստեղծել, Տեսեք,

Դրանից հետո ստեղծվում է նոր աշխատանքային գրքույկ `հինգ օրացուցային աշխատանքային թերթերով: Տեսեք,
Ձեր պատասխանը ուղարկված չէ:
Եթե դուք պարզապես ուզում եք ստեղծել որոշակի ամսվա օրացույց, պարզապես անհրաժեշտ է նույն ամիսը ընտրել թե՛ Տողից և թե՛ տողում երկխոսության դաշտում:
Սեղմեք այստեղ ՝ հավիտենական օրացույցի մասին ավելին իմանալու համար
Գրասենյակի արտադրողականության լավագույն գործիքները
Լրացրեք ձեր Excel-ի հմտությունները Kutools-ի հետ Excel-ի համար և փորձեք արդյունավետությունը, ինչպես երբեք: Kutools-ը Excel-ի համար առաջարկում է ավելի քան 300 առաջադեմ առանձնահատկություններ՝ արտադրողականությունը բարձրացնելու և ժամանակ խնայելու համար: Սեղմեք այստեղ՝ Ձեզ ամենաշատ անհրաժեշտ հատկանիշը ստանալու համար...
")
Office Tab- ը Tabbed ինտերֆեյսը բերում է Office, և ձեր աշխատանքը շատ ավելի դյուրին դարձրեք
- Միացնել ներդիրներով խմբագրումը և ընթերցումը Word, Excel, PowerPoint- ով, Հրատարակիչ, Access, Visio և Project:
- Բացեք և ստեղծեք բազմաթիվ փաստաթղթեր նույն պատուհանի նոր ներդիրներում, այլ ոչ թե նոր պատուհաններում:
- Բարձրացնում է ձեր արտադրողականությունը 50%-ով և նվազեցնում մկնիկի հարյուրավոր սեղմումները ձեզ համար ամեն օր:
")