Բաց թողնել հիմնական բովանդակությունը

Ինչպե՞ս Outlook- ի օրացույցում նշանակումը նշանակել մեկ այլ օրվա:

Outlook- ի օրացույցում ես փորձեցի հանդիպումը պատճենել մեկ այլ օրվա `պատճենելով և տեղադրելով: Այնուամենայնիվ, միայն նշանակման թեման պատճենվեց, ինչպես ցույց է տրված նկարում: Բայց ես պետք է պատճենեմ ամբողջ նշանակումը, բացառությամբ դրա մեկնարկի / ավարտի ամսաթվի, գաղափարներ:


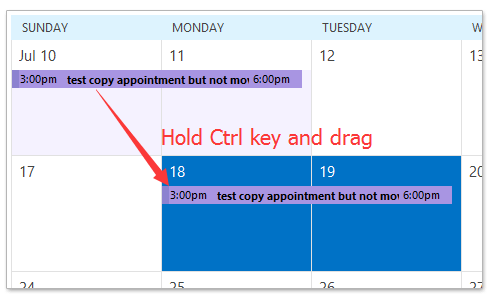
Պատճենեք նշանակումը մեկ այլ օրվա Outlook օրացույցում ՝ Ctrl ստեղնով

Է Օրացույց Outlook- ի տեսքը, ընտրեք այն հանդիպումը, որը դուք կպատճենեք, քաշեք այն մեկ այլ օր `պահելով այն Ctrl ստեղնը, ապա ազատել մկնիկը:

Եվ այժմ ընտրված նշանակումը պատճենվում է ուղիղ մեկ այլ օրվա `բացառությամբ դրա մեկնարկի և ավարտի ամսաթվի: Տեսեք,


Պատճենը նշանակեք մեկ այլ օրվա Outlook օրացույցում ՝ մկնիկի աջ կոճակով

Է Օրացույց Outlook- ի դիտումը, քաշեք հանդիպումը մկնիկի աջ կոճակը պահելով, մկնիկը բաց թողեք մինչև այն օրը, որին դուք պատճենեք, ապա ընտրեք պատճեն ելնելով համատեքստային ընտրացանկից: Տեսեք,

Եվ հիմա նշանակումը պատճենվում է Outlook- ի Օրացույցում նշված օրը: Տեսեք,

Յուրաքանչյուր էլփոստ ինքնաբերաբար փոխանցեք Outlook- ի նշված ստացողին

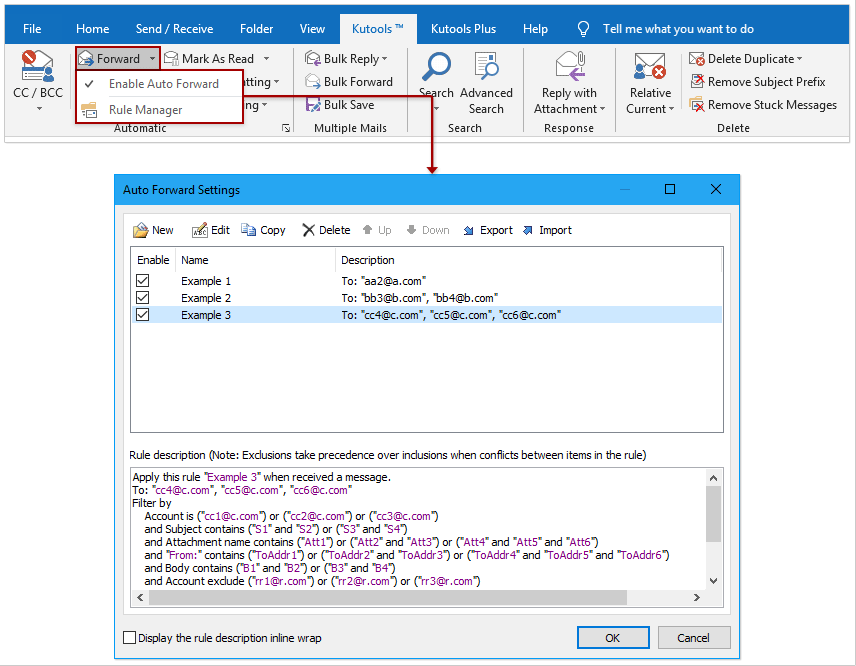
Ընդհանուր առմամբ, մենք կարող ենք կանոն սահմանել ՝ էլ. Փոստը ավտոմատ կերպով փոխանցելու նշված հասցեատերերին, ինչպիսիք են ձեր մեկ այլ էլփոստի հաշիվը, ձեր Gmail- ը կամ ձեր գործընկերները և այլն: Բայց, գիտենք, որ սովորական կանոն կազմաձևելու համար երկար ժամանակ կպահանջվի Հեռանկար Այժմ մենք ներկայացնում ենք Kutools- ը Outlook- ի համար (Ավտոմատ) առաջ հատկություն, որը կարող է ավտոմատ փոխանցման կանոն սահմանել միայն մի քանի կտտոցով:


ավտոմատ փոխանցել էլ

Առնչվող հոդվածներ


Գրասենյակի արտադրողականության լավագույն գործիքները

Outlook- ի համար նախատեսված գործիքներ - Ավելի քան 100 հզոր գործառույթ՝ ձեր Outlook-ը լիցքավորելու համար

🤖 AI Փոստի օգնական: Ակնթարթային պրոֆեսիոնալ նամակներ AI մոգությամբ. մեկ սեղմումով հանճարեղ պատասխաններ, կատարյալ հնչերանգներ, բազմալեզու վարպետություն: Փոխակերպեք էլ. փոստը առանց ջանքերի: ...

📧 Email ավտոմատացում: Գրասենյակից դուրս (հասանելի է POP-ի և IMAP-ի համար)  /  Ժամանակացույց ուղարկել նամակներ  /  Ավտոմատ CC/BCC էլփոստ ուղարկելիս կանոններով  /  Ավտոմատ փոխանցում (Ընդլայնված կանոններ)   /  Ավտոմատ ավելացնել ողջույնները   /  Ավտոմատ կերպով բաժանել բազմասերիստացող նամակները առանձին հաղորդագրությունների ...

📨 էլեկտրոնային կառավարման: Հեշտությամբ հիշեք նամակները  /  Արգելափակել խարդախության նամակները ըստ առարկաների և այլոց  /  Deleteնջել կրկնօրինակ նամակները  /  Ընդլայնված որոնում  /  Համախմբել Թղթապանակները ...

📁 Հավելվածներ ProԽմբաքանակի պահպանում  /  Խմբաքանակի անջատում  /  Խմբաքանակային կոմպրես  /  Auto Save- ը   /  Ավտոմատ անջատում  /  Ավտոմատ սեղմում ...

🌟 Ինտերֆեյս Magic: 😊Ավելի գեղեցիկ և զով էմոջիներ   /  Բարձրացրեք ձեր Outlook-ի արտադրողականությունը ներդիրներով դիտումների միջոցով  /  Նվազագույնի հասցնել Outlook-ը փակելու փոխարեն ...

???? Մեկ սեղմումով Հրաշքներ: Պատասխանել բոլորին մուտքային հավելվածներով  /   Հակաֆիշինգի էլ. նամակներ  /  🕘Ցուցադրել ուղարկողի ժամային գոտին ...

👩🏼‍🤝‍👩🏻 Կոնտակտներ և օրացույց: Խմբաքանակի ավելացրեք կոնտակտներ ընտրված էլ  /  Կոնտակտային խումբը բաժանեք առանձին խմբերի  /  Հեռացնել ծննդյան հիշեցումները ...

Over 100 Նկարագրություն Սպասեք ձեր հետազոտությանը: Սեղմեք այստեղ՝ ավելին բացահայտելու համար:


Comments (12)
Rated 5 out of 5 · 1 ratings
This comment was minimized by the moderator on the site
Muito obrigado! Funciona e é simples e rápido de fazer. A explicação com as imagens ajudou muito.
Rated 5 out of 5
This comment was minimized by the moderator on the site
I was able to follow Bethanne's comments and was successful after cursing MS on this for months. THANKS! "Find your folders pane. Mine is on the left of the screen and shows just two months over the list of folders. One can resize the folders pane to reveal more months. There's a border between the folders pane and the main calendar view. Hover over that border and your cursor arrow changes to the column resize icon. Now drag the border over to make the folders pane bigger and the main view smaller. More months will appear in the folders pane." Then, follow the suggestion to hold CTRL to copy while dragging the appointment you want to duplicate to the new callendar location, and DROP it.
This comment was minimized by the moderator on the site
On the left side of your screen should be a folder pane. Open and pin it to stay open, if it is not already. Click on the date of the appointment/meeting you want to copy. Then find the date in the control pane you want to copy the appointment/meeting to. Hold the ctrl button while clicking on the date(s) you want to copy to. All chosen date should appear on your screen. Then you can use the drag and drop with right click on the mouse, or hold ctrl while drag & dropping to the next date(s).
This comment was minimized by the moderator on the site
On my machine, any of the copy-paste methods (inc. ctrl+c, ctrl+v) do not copy the reminder - the one thing that definitely should be copied!
This comment was minimized by the moderator on the site
Thank you, thank you, thank you for posting this!
This comment was minimized by the moderator on the site
On a Macintosh computer, you hold down the Option key, then click and drag the item to a different day.
This comment was minimized by the moderator on the site
Copying the appointment by dragging doesn't work if the target date is not visible on the screen. The calendar does not scroll while you are dragging the appointment.
This comment was minimized by the moderator on the site
Hi,
Here is a workaround may help you.
Drag to copy the appointment to any one date close to the target appointment, and then modify the start date and end date of the new appointment.
Hope it helpful!
This comment was minimized by the moderator on the site
Agree, this is what I am trying to do as well. Anyone found a solution?
This comment was minimized by the moderator on the site
Did you find an answer for this, Guy? I need to know the very same thing.
This comment was minimized by the moderator on the site
Sandra's got the right answer, but I'll be more specific: Find your folders pane. Mine on the left of the screen and shows just two months over the list of folders. One can resize the folders pane to reveal more months. There's a border between the folders pane and the main calendar view. Hover over that border and your cursor arrow changes to the column resize icon. Now drag the border over to make the folders pane bigger and the main view smaller. More months will appear in the folders pane. It drove me absolutely crazy until I figured this out.
This comment was minimized by the moderator on the site
where you can view multiple months on the side or wherever you position them, you can view more than a year's worth if you click and drag the dragger* (sorry i don't know the correct term) you can then right-click your calendar invite, drag & drop it onto any day you choose
There are no comments posted here yet
Please leave your comments in English
Posting as Guest
×
Rate this post:
0   Characters
Suggested Locations