Բաց թողնել հիմնական բովանդակությունը

Ինչպե՞ս ավելացնել Outlook- ում Ribbon- ի ձևանմուշի դյուրանցումներ:

Կաղապարներ կիրառելու համար դա խնայող հնարք է, երբ հաճախակի եք ուղարկում նույն տեքստի, դասավորության կամ հատուկ ձևաչափի ոճերով էլեկտրոնային հաղորդագրություններ: Այնուամենայնիվ, ինչն է ձեզ զայրացնում, դուք կարող եք չհասկանալ, թե որտեղ են կաղապարները կամ շատ ժամանակ ծախսել դրանց հայտնաբերման վրա: Իրականում կան մի քանի անգամ խնայող հնարքներ ՝ Microsoft Outlook 2010 և 2013 թվականների ժապավենի կաղապարներին դյուրանցումներ ավելացնելու և ձեզ մեկ կտտոցով կաղապարներ կիրառելու հնարավորություն տալու համար:

Templateապավենի մեջ կաղապարին դյուրանցում ավելացրեք ՝ արագ քայլեր ստեղծելով

Templateապավենի մեջ կաղապարին դյուրանցում ավելացրեք ՝ QAT- ում ավելացնելով Ընտրեք ձևեր

Office Tab - Միացրեք ներդիրներով խմբագրումը և զննարկումը Microsoft Office-ում, ինչը հեշտացնում է աշխատանքը
Kutools Outlook-ի համար - Բարձրացրեք Outlook-ը 100+ առաջադեմ հատկություններով բարձր արդյունավետության համար
Ամրապնդեք ձեր Outlook 2021 - 2010 կամ Outlook 365 այս առաջադեմ գործառույթները: Վայելեք համապարփակ 60-օրյա անվճար փորձարկումը և բարձրացրեք ձեր էլփոստի փորձը:

նետ կապույտ աջ պղպջակTemplateապավենի մեջ կաղապարին դյուրանցում ավելացրեք ՝ արագ քայլեր ստեղծելով

Եթե ​​սովորաբար էլփոստով հաղորդագրություններ եք ուղարկում ինչ-որ հատուկ տեքստով, կարող եք ձևանմուշ ստեղծել հատուկ տեքստով և այն ավելացնել դրան Արագ քայլեր տուփ:

Քայլ 1: Սեղմեք Ստեղծել նոր է Արագ քայլեր խումբ տակ Գլխավոր էջանիշը.

Քայլ 2. Խմբագրել արագ քայլ երկխոսության դաշտում

  1. Մուտքագրեք անուն ՝ նոր ձևանմուշի համար Անունը: տուփ;
  2. Կտտացրեք կոճակին Ընտրեք գործողություն տուփը և ընտրեք նոր հաղորդագրություն բացվող ցանկում:

Քայլ 3: Սեղմեք Ցույց տալ ընտրանքները ստորեւ տուփ:

Քայլ 4. Նոր ձևանմուշում լրացրեք տեղեկատվությունը հետևյալով.

  1. Մուտքագրեք ստացողների էլ. Հասցեները տուփ
  2. Մուտքագրեք թեմայի վերաբերյալ տեղեկատվությունը Թեմա. տուփ
  3. Նախանշեք դրոշը և կարևորությունը
  4. Մուտքագրեք հատուկ տեքստը Lyrics քանակը: տուփ:

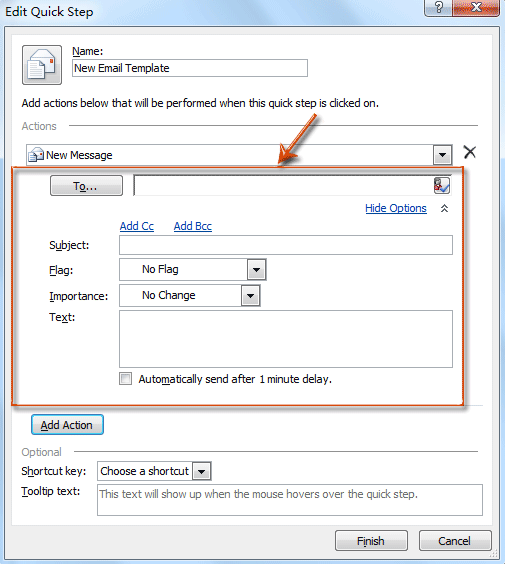
Քայլ 5: Սեղմեք Ավարտել կոճակը:

Այս պահի դրությամբ նոր ձևանմուշը ավելացվել է Արագ քայլեր վանդակում ՝ ցույց տալով որպես անուն, որը մուտքագրում եք Քայլ 2-ում:

Նշում: Դյուրանցման բանալին հնարավոր չէ կիրառել այս արագ քայլերի գործողության մեջ:
  Microsoft Outlook 2007-ի հիմնական ինտերֆեյսի դասական տեսքի արդյունքում այս մեթոդը անվավեր է Microsoft Outlook 2007-ում:

նետ կապույտ աջ պղպջակTemplateապավենի մեջ կաղապարին դյուրանցում ավելացրեք ՝ QAT- ում ավելացնելով Ընտրեք ձևեր

Ofամանակի մեծ մասը, ոչ միայն հատուկ տեքստը, դուք կարող եք էլ-նամակ ուղարկել հատուկ դասավորության և ձևաչափի ոճերով: Այս մեթոդը կօգնի ձեզ բացել ձևանմուշների գրադարանը, և ձեզ հնարավորություն կտա արագորեն ընտրել և կիրառել ձևանմուշները:

Քայլ 1. Բացեք Կաղապարի գրադարանը ՝ սեղմելով այն Նոր Ապրանքներ > Ավելի շատ իրեր > Ընտրեք ձևեր;

Ի դեպ, Outlook 2007-ում կարող եք սեղմել այն Ֆայլ > նոր > Ընտրեք ձևեր անմիջականորեն.

Քայլ 2. Ընտրեք ձևի երկխոսության դաշտում ընտրեք Ստանդարտ ձևանմուշներ է Տես: տուփը կամ կտտացրեք այն Browser կոճակ կաղապարներ պարզելու համար:

Իրականում, դուք կարող եք ավելացնել այն Ընտրեք ձեւը հրամանը մուտք գործեք Արագ մուտքի Գործիքադարակի մեջ Microsoft Outlook 2010 և 2013 թվականներում: Եվ դա իրականացնելու մի քանի եղանակ կա:

Մեթոդ Ա.

Քայլ 1: Սեղմեք Նոր Ապրանքներ > Ավելի շատ իրեր.

Քայլ 2. Աջ կտտացրեք կոճակին Ընտրեք ձեւը հատ.

Քայլ 3. Աջ կտտոցի ընտրացանկում ընտրեք Ավելացնել Արագ մուտքի Գործիքադարակում հատ.

Դրանից հետո ընտրեք Ձևի հրամանը անմիջապես ավելացվում է Արագ մուտքի Գործիքադարակի մեջ:

Մեթոդ Բ.

Քայլ 1: Սեղմեք Ֆայլ > Ընտրանքներ.

Քայլ 2. Outlook- ի ընտրանքների երկխոսության դաշտում կտտացրեք այն Արագ մուտք Գործիքադարակը ձախ բարում:

Քայլ 3. Դեպի Ընտրեք հետեւյալ հրահանգները. տուփը կտտացրեք կոճակին և ընտրեք այն Բոլոր հրամանները իջնում ​​ցանկից:

Քայլ 5. Ընտրեք և կարևորեք այն Ընտրեք ձեւը կետը հրամանների վանդակում:

Քայլ 6: Սեղմեք Ավելացնել կոճակը:

Քայլ 7: Սեղմեք OK կոճակը:

Այժմ «Ընտրեք ձևը» հրամանը միանգամից հայտնվում է Արագ մուտքի գործիքագոտում:

Նշում: Microsoft Outlook 2007-ի հիմնական ինտերֆեյսում ժապավեն չկա, հետևաբար այս մեթոդները վավեր չեն Microsoft Outlook 2007-ում:


Գրասենյակի արտադրողականության լավագույն գործիքները

Outlook- ի համար նախատեսված գործիքներ - Ավելի քան 100 հզոր գործառույթ՝ ձեր Outlook-ը լիցքավորելու համար

🤖 AI Փոստի օգնական: Ակնթարթային պրոֆեսիոնալ նամակներ AI մոգությամբ. մեկ սեղմումով հանճարեղ պատասխաններ, կատարյալ հնչերանգներ, բազմալեզու վարպետություն: Փոխակերպեք էլ. փոստը առանց ջանքերի: ...

📧 Email ավտոմատացում: Գրասենյակից դուրս (հասանելի է POP-ի և IMAP-ի համար)  /  Ժամանակացույց ուղարկել նամակներ  /  Ավտոմատ CC/BCC էլփոստ ուղարկելիս կանոններով  /  Ավտոմատ փոխանցում (Ընդլայնված կանոններ)   /  Ավտոմատ ավելացնել ողջույնները   /  Ավտոմատ կերպով բաժանել բազմասերիստացող նամակները առանձին հաղորդագրությունների ...

📨 էլեկտրոնային կառավարման: Հեշտությամբ հիշեք նամակները  /  Արգելափակել խարդախության նամակները ըստ առարկաների և այլոց  /  Deleteնջել կրկնօրինակ նամակները  /  Ընդլայնված որոնում  /  Համախմբել Թղթապանակները ...

📁 Հավելվածներ ProԽմբաքանակի պահպանում  /  Խմբաքանակի անջատում  /  Խմբաքանակային կոմպրես  /  Auto Save- ը   /  Ավտոմատ անջատում  /  Ավտոմատ սեղմում ...

🌟 Ինտերֆեյս Magic: 😊Ավելի գեղեցիկ և զով էմոջիներ   /  Բարձրացրեք ձեր Outlook-ի արտադրողականությունը ներդիրներով դիտումների միջոցով  /  Նվազագույնի հասցնել Outlook-ը փակելու փոխարեն ...

???? Մեկ սեղմումով Հրաշքներ: Պատասխանել բոլորին մուտքային հավելվածներով  /   Հակաֆիշինգի էլ. նամակներ  /  🕘Ցուցադրել ուղարկողի ժամային գոտին ...

👩🏼‍🤝‍👩🏻 Կոնտակտներ և օրացույց: Խմբաքանակի ավելացրեք կոնտակտներ ընտրված էլ  /  Կոնտակտային խումբը բաժանեք առանձին խմբերի  /  Հեռացնել ծննդյան հիշեցումները ...

Over 100 Նկարագրություն Սպասեք ձեր հետազոտությանը: Սեղմեք այստեղ՝ ավելին բացահայտելու համար:


Comments (22)
No ratings yet. Be the first to rate!
This comment was minimized by the moderator on the site
Easy, select the template file in Windows Explorer and drag and drop it in the task bar, you'll be indicated that it has been pinned in Outlook, then, to use it, just right click Outlook in the task bar and you'll be able to select the template directly. Let me know if you need any screen shots for that.

Thanks,

JL
This comment was minimized by the moderator on the site
could you please share screenshots? I'm not sure what you mean by drag into the task bar
This comment was minimized by the moderator on the site
This method is amazing thanks!
This comment was minimized by the moderator on the site
I've got an alternative 'outside of the box' suggestion - Use signature process for your templates instead.

Construct your email with the necessary formatting. Copy the full email. Create a new signature - template 1 for example and then paste the full email in.

Then when you want to use the template open a blank email and select Insert - Signature - Template 1


The only disadvantage this has over the traditional template is you can't preload the To: CC: and subject field etc. but it is quite easy to select your templates
This comment was minimized by the moderator on the site
@DavidJackson
Thank you...Thank you. After trying a little bit of everything, this worked for me :). I'll can use the quick steps above to create a preloaded email w/ To:, CC:, & Subject, and then use your suggestion to complete the body of the email. It's a 2 step process, but it works for me......beats the alternative :).
This comment was minimized by the moderator on the site
I'd like to add several template emails in the Quick Step area from which several other employees can access as well. Is this possible?
This comment was minimized by the moderator on the site
On my laptop, I can go into the choose form which opens the dialogue box to pick my template. I then push the end button which takes me to location of where my templates are stored. Works great for me, but on my desktop, I can't get this option to work. All the file locations for the templates have been setup, but the end button keeps taking me to a different location. It takes me to looking inside one of my mailboxes. Any help with this would be greatly appreciated.
This comment was minimized by the moderator on the site
Wim, you saved me tons of time! Thanks!
This comment was minimized by the moderator on the site
Very creative solution! I have templates that always have attachments and this solution works great!
This comment was minimized by the moderator on the site
I think I may have found a doable workaround. I agree with Daniel that the solutions above don't really give what we need: a direct link to a template that we want to use time and time again. This is what I did, and it makes it good enough for me: 1. Create the template and save it. The template will be stored in a directory on your hard disk, depending on your operating system: 1a. Windows 7 and Windows Vista saves the template in c:\users\username\appdata\roaming\microsoft\templates 1b. Windows XP saves the template in c:\documents and settings\username\application data\microsoft\templates 2. Browse to that directory, and now right-click the template file (keep holding the right mouse button!), and drag the template file onto your start bar, and then release the right mouse button 3. The template is now "pinned" on outlook in your startbar 4. To use the template, simply right-click on outlook in your startbar, and your template will show up in the "pinned" items, ready for you to use.
This comment was minimized by the moderator on the site
Thank you so much for this simple fix! I've been Googling macros, adding new tab in Outlook etc but this works perfectly! We'll be adding Outlook templates to all our computers in the office and have been trying to figure this out, you have no idea how happy you have made us!
This comment was minimized by the moderator on the site
Amazing!! i have to send 40+ emails with almost the same text, so each one needs slightly customising. This has saved me from sure repetitive strain injury, many thanks.
This comment was minimized by the moderator on the site
That is a great solution! I used to have placed the "Templates" folder in the task bar (created by right click Task bar | Toolbars | New Toolbar...). This way works better if you have many templates as clicking the double 'greater than' sign besides "Templates" pops up all contents including any new .oft files inside the folder. The downside is that the "Template" folder now takes some space away from my taskbar and its not part of Outlook 'group'. However if just adding 2 or 3 .oft file links, this is the best logical place to tied it with the Outlook icon in the task bar. Thanks WIM
This comment was minimized by the moderator on the site
Awesome, Thank for posting the first real solution to this issue.
This comment was minimized by the moderator on the site
Awesome, thanks for posting this!
This comment was minimized by the moderator on the site
Thank you, Wim! I've been trying to figure out an easy way since I have been upgraded to 2013. So happy to have found this!
This comment was minimized by the moderator on the site
Thanks for sharing Wim Chalmet. :-)
This comment was minimized by the moderator on the site
None of these steps are actually helpful. 1st method will create template, but unfortunately only in plain text - you cannot save template with colors or any modification. Using 2nd method will only allow you to access choose form, where you will still need to look for right template.
This comment was minimized by the moderator on the site
You can change it from plain text to HTML. In the template, click on the FORMAT TEXT tab. In the FORMAT section, there is an HTML option. Then save it again.
This comment was minimized by the moderator on the site
Just save what you often use in a signature and open your email standard with this signature...
This comment was minimized by the moderator on the site
I have Outlook 2013. I have an email template that I will use thousands of times. Q: How do I keep it there after each send so I don’t have to retrieve it and open it up every time?
This comment was minimized by the moderator on the site
Just save your template as a signature and open your email standard with this signature.
There are no comments posted here yet
Please leave your comments in English
Posting as Guest
×
Rate this post:
0   Characters
Suggested Locations