6 Easy Methods for Recovering Unsaved Excel Files
Ever lost hours of work on an Excel document due to a crash or accidental closure? Fear not! In this guide, we cover how to swiftly recover unsaved Excel files and revert to earlier versions for Excel 2010 - 365. Discover the best practices for backing up your work, either locally or in the cloud, and learn how to restore overwritten files to salvage your work without a hitch.
Setting Up AutoRecover
What is AutoRecover?
AutoRecover is a feature in Microsoft Excel that automatically saves your workbook at specified intervals. This means that in case of an application crash or system failure, you can recover your work up to the last saved AutoRecover point. It's a crucial feature that acts as a safety net during unexpected shutdowns.
Setting Up AutoRecover
To activate and customize the AutoRecover settings in Excel, follow these steps:
Բացեք Excel- ի ընտրանքներԿտտացրեք Ֆայլ in the top left corner, then choose Ընտրանքներ կողային տողի ներքևի մասում:
Navigate to Save Settings: In the Excel Options dialog box, select Փրկել from the menu on the left-hand side.

Customize AutoRecover Options: Here, you'll find options related to saving your workbooks. Ensure the Խնայեք ավտոմատ վերականգնման տեղեկատվությունը ամեն րոպե checkbox and Keep the last AutoRecover version is I close without saving checkbox are selected. Next to it, you can set the time interval for how frequently Excel saves an AutoRecover copy of your workbook. The default is usually set to 10 minutes, but you can adjust this to suit your working style.
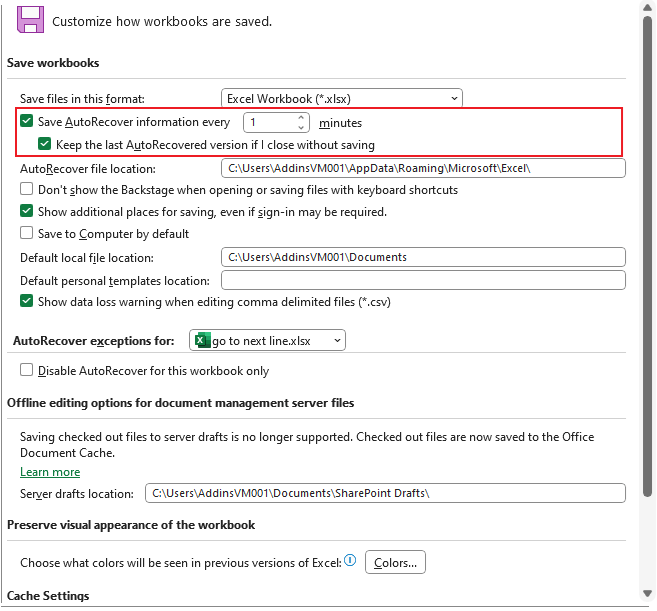
Specify the AutoRecover File Location: You can also choose where to save these AutoRecover files by browsing and setting a specific folder.

Limitations of AutoRecover
While AutoRecover can be a lifesaver, it's crucial to understand its limitation:
Only Works for Previously Saved Files: AutoRecover cannot restore unsaved documents. It only works on files that have been saved at least once. For new documents, you need to save them manually first before AutoRecover can protect them.
Կարեւոր Note
Once AutoRecover is set up, it enables the functionality of Excel's recovery methods in Excel, such as the Document Recovery pane, Recover Unsaved Workbooks, and viewing versions list. These tools rely on the existence of AutoRecover data to function.
By setting up AutoRecover, you ensure that you're not starting from scratch after an unexpected shutdown. Although it's not a replacement for regularly saving your work, it serves as a critical backup mechanism that can significantly mitigate data loss. Remember, a few clicks to set up AutoRecover now can save you a lot of time and trouble later.
Recover unsaved files
Hours of work on an Excel file gone in a blink due to an unexpected shutdown or crash. Before you resign yourself to starting over, you should know that Microsoft Excel offers a lifeline for just these situations. There are two primary methods to recover unsaved Excel files, each a potential game-changer for salvaging your hard work.
Method 1: Using the Document Recovery Pane
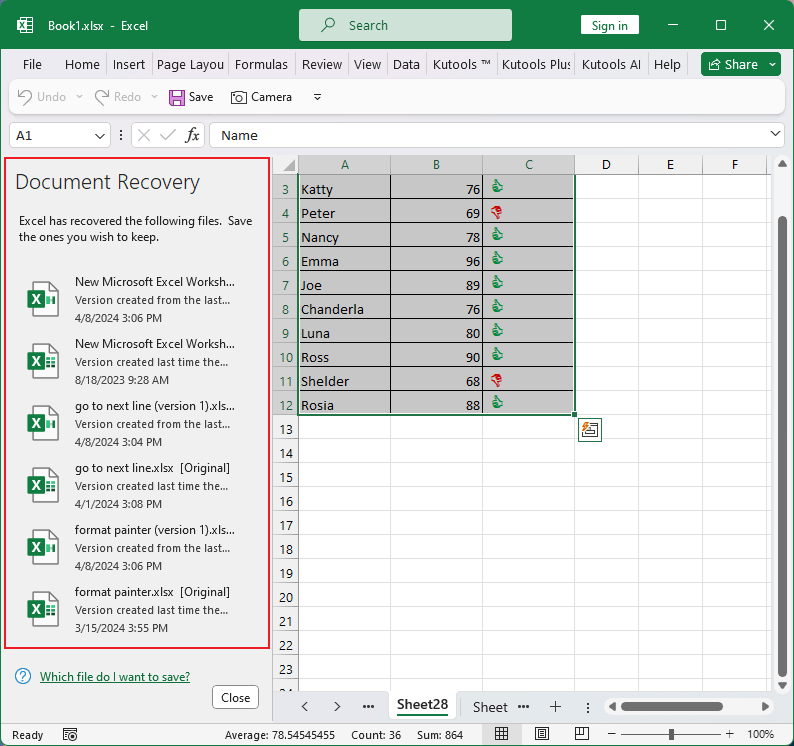
Excel is designed with a failsafe for sudden shutdowns or crashes. The Document Recovery Pane is a feature that automatically appears upon restarting Excel after an unexpected close. This pane displays recoverable versions of your files, ensuring that all is not lost.
When Does It Appear?
This feature is activated only in the event of an abnormal termination of the Excel application, such as a crash or a power outage.
Ինչպե՞ս օգտագործել այն:
Upon reopening Excel, you’ll see the Document Recovery Pane on the left side of the window. It lists all files that were open at the time of the crash, each with a status indicating the recovery potential.
Simply click on the file you wish to recover, and Excel will attempt to restore it.
Method 2: Opening Recover Unsaved Workbooks
Not all situations of lost work result from crashes. Sometimes, you might close a workbook without saving, either by accident or due to a lapse in judgment. For these scenarios, Excel provides another route to recovery.
How to Access?
There are two ways to navigate to Recover Unsaved Workbooks:
-
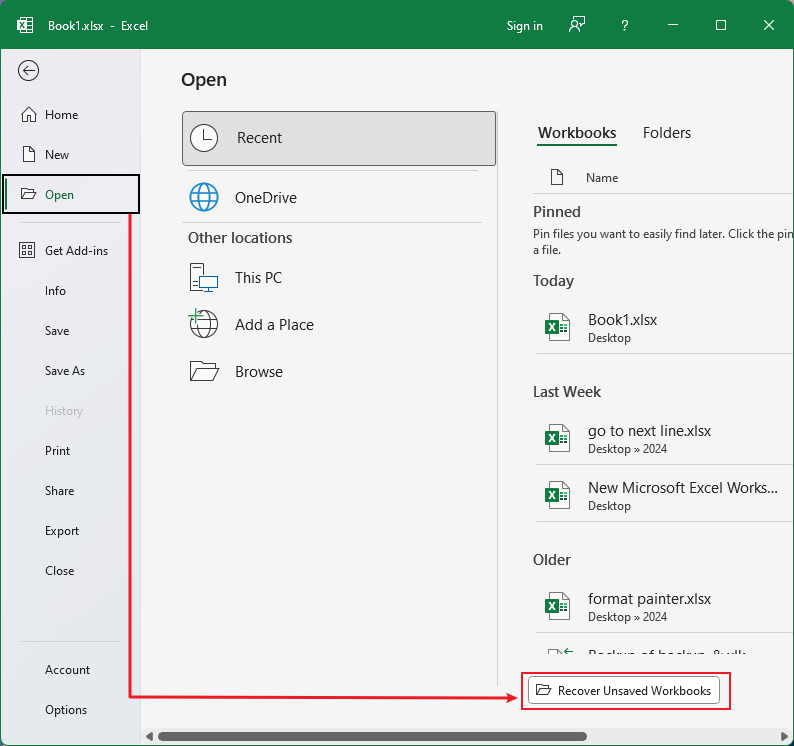
AԿտտացրեք Ֆայլընտրեք բաց, ապա սեղմեք Վերականգնել չպաշտպանված աշխատանքային տետրերը at the bottom of the recent files list.
-
B: Սեղմիր Ֆայլ, Գնալ Info, ներքեւում Կառավարեք աշխատանքային գրքույկ, you’ll find an option to Վերականգնել չպաշտպանված աշխատանքային տետրերը.

Both methods will open a dialog box where Excel has stored autosaved versions of your workbooks. These files are temporary and are only kept for a limited time, based on your AutoRecover settings.

Recovering unsaved files in Excel is relatively straightforward, thanks to these built-in features. However, their effectiveness is directly tied to your AutoRecover settings. Ensuring that AutoRecover is enabled and set to save at frequent intervals increases the chances of recovering your work in full.
It’s worth noting that these methods primarily cover scenarios where the file was not saved at all or where changes were made post the last save. For overwritten files or files saved with errors, you might need to explore version history or third-party data recovery tools.
In conclusion, while Excel offers robust solutions for recovering unsaved work, the best data loss prevention is regular saving. Use these recovery features as a backup, not a primary save strategy, and consider cloud saving options for an added layer of security.
Recover overwritten files
In the dynamic environment of Excel, it's not uncommon to accidentally overwrite important files. Fortunately, Excel provides built-in features that allow for the recovery of overwritten content, ensuring that your hard work is not lost. This article outlines two effective methods to recover overwritten files in Excel, making it possible to retrieve workbook content from moments before the accidental overwrite.
Method 1: Using Versions from File Info
Excel's AutoRecover feature periodically saves a version of your workbook during the editing process. This function operates silently in the background and can be a lifesaver in situations where content is overwritten.
Here's how to access and utilize these versions:
Navigate to File > Info: Move to the Կառավարեք աշխատանքային գրքույկ section on the right-hand side, you can see a list of autosave versions of your file.
Select Your Desired Version: From the listed versions, choose the one that corresponds to the point in time before your content was overwritten. Click on it to open and review the version.

Recover Your Content: If the version matches your recovery needs, you can then save it as a new file or overwrite the current file to reclaim your lost data.

Method 2: Using Kutools for Excel's Snap Feature
While Excel's built-in versions provide a straightforward path to content recovery, Excel- ի համար նախատեսված գործիքներ offers an additional layer of flexibility through its Շառաչ feature. Unlike the automatic versions created by Excel, Snapshots allow for manual saves of workbook states, offering more control over the recovery process.
Ահա թե ինչպես օգտագործել այն.
Սեղմել Կուտոլս > Դիտել > Շառաչ > Հետևեք Snap- ին, a snapshot of your workbook’s current state is created. You can create as many snapshots as you need. Should you overwrite your content, you can open the Snapshot to revert to the previously saved state of your workbook.
Կարեւոր նշում.
Snapshots are temporary and will be lost once the workbook is closed. Therefore, it's crucial to use this feature judiciously and save important versions permanently before ending your session.
Elevate your Excel experience with Kutools for Excel, offering over 300 powerful features designed to streamline complex tasks and enhance productivity. Discover unparalleled efficiency and unlock new potentials in data management—try it free for 30 days and transform your spreadsheets effortlessly!
Whether you're utilizing Excel's built-in versioning capability or employing Kutools for Excel's Snapshot feature, these methods provide powerful tools for recovering overwritten content. By understanding and applying these techniques, you can safeguard your data against accidental loss, ensuring the integrity of your Excel documents.
Always create a backup for files
Working on complex Excel files without a backup is akin to walking a tightrope without a safety net. A single accidental deletion, an unexpected software crash, or even a power outage can lead to loss of hours or even days of work. Activating the Always Create Backup option provides a layer of protection, ensuring that a previous version of your workbook is always available for recovery.
How to Enable Always Create Backup
Create A New Workbook: Begin by creating the Excel workbook for which you want to create backups.
Access the Save OptionsԿտտացրեք Ֆայլ ապա ընտրեք Փրկել from the left-hand menu then choose one destination from right-hand side.
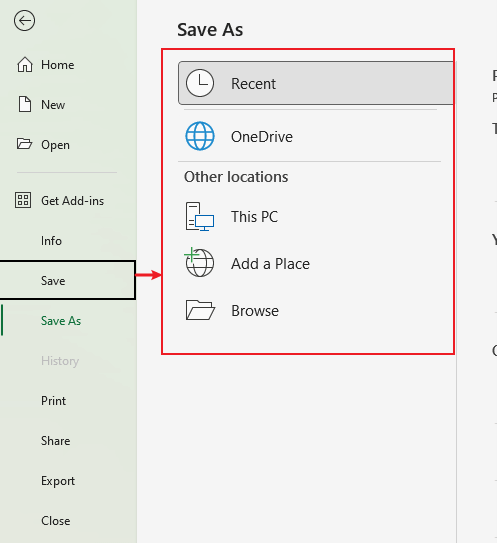
Configure Save Settings: Choose a folder and give a name for your file.

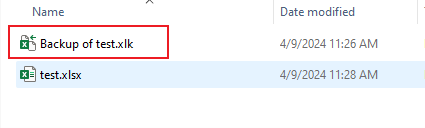
Enable Backup Creation: Still in the Save As dialog, click Գործիքներ drop-down list, and choose Ընդհանուր Ընտրանքներ, ապա նշեք Always create backup checkbox, then click OK.

Save the workbook: Back to Save As dialog, click Փրկել button to save the workbook.
When you save your workbook—whether by clicking the Save button, closing the workbook, or pressing Ctrl + S—Excel will create a backup that preserves the workbook's state just before saving. With each subsequent save, the backup's contents update to reflect the saved state of the workbook last time.
Open AutoSave feature in Excel 365
Excel 365 has introduced a lifesaver feature known as AutoSave, revolutionizing how we handle data by ensuring that our hard work is never lost due to unexpected shutdowns or manual saving oversights.
What is AutoSave?
AutoSave is a feature exclusive to Excel 365 that automatically saves your work in real-time. It's designed to protect your data against accidental loss by continuously updating your file as you make changes. This feature is particularly useful when working on shared documents or extensive datasets where changes occur rapidly.
Enabling AutoSave in Excel 365
Activating AutoSave is straightforward and can significantly impact your workflow efficiency. Here’s how you can enable it:
Open Excel 365: Launch Excel and open the document you wish to work on.
Toggle AutoSave: Look for the AutoSave toggle switch at the top-left corner of the Excel window, right next to the document title. Click the AutoSave- ը միացրեք այն միացնելու համար:

If you’re working on a new document, you'll be prompted to save your file to OneDrive or SharePoint since AutoSave works by saving documents to the cloud.

By familiarizing yourself with these recovery methods and regularly backing up your data, you can significantly reduce the risk of data loss in Excel. Whether you're dealing with unsaved changes, overwritten data, or seeking to implement preventive measures like AutoSave in Excel 365, these tips and tools can help safeguard your important work.
Ավելի շատ խաղի փոփոխող Excel ռազմավարությունների համար, որոնք կարող են բարձրացնել ձեր տվյալների կառավարումը, ավելի մանրամասն ուսումնասիրեք այստեղ:
Գրասենյակի արտադրողականության լավագույն գործիքները
Kutools Excel- ի համար - օգնում է ձեզ առանձնանալ բազմությունից
Excel-ի համար Kutools-ը պարծենում է ավելի քան 300 առանձնահատկություններով, Ապահովել, որ այն, ինչ ձեզ հարկավոր է, ընդամենը մեկ սեղմումով հեռու է...
")
Office Tab - Միացնել ներդիրներով ընթերցումը և խմբագրումը Microsoft Office- ում (ներառիր Excel)
- Մեկ վայրկյան ՝ տասնյակ բաց փաստաթղթերի միջև փոխելու համար:
- Նվազեցրեք ձեզ համար ամեն օր մկնիկի հարյուրավոր կտտոցներ, հրաժեշտ տվեք մկնիկի ձեռքին:
- Բարձրացնում է ձեր արտադրողականությունը 50%-ով բազմաթիվ փաստաթղթեր դիտելիս և խմբագրելիս:
- Արդյունավետ ներդիրներ է բերում Office (ներառյալ Excel-ը), ինչպես Chrome-ը, Edge-ը և Firefox-ը:
")
Բովանդակություն
- Setting Up AutoRecover
- Recover unsaved files
- By Using the Document Recovery Pane
- By Opening Recover Unsaved Workbooks
- Recover overwritten files)
- By Using Versions from File Info
- By Using Kutools for Excel's Snap Feature
- Always create a backup for files
- Open AutoSave feature in Excel 365